ログイン後の処理を実装しました。 expoのソーシャルログインは保守が大変なので最小限の実装として、iOSはSign In with Apple、AndroidはGoogleログインのみサポートする予定
Pull Request
実装
iOSでSign In with Appleを実装
実装は以下を参考に作成(expoのアプリ内で使用する方法のみ記載、スタンドアローンアプリの場合はプロファイル側の修正も必要です)
こちらは、ドキュメント通りに実装すればOKで、まずapp.config.tsに以下を追加
  ios: {
    usesAppleSignIn: true,  // ←追加
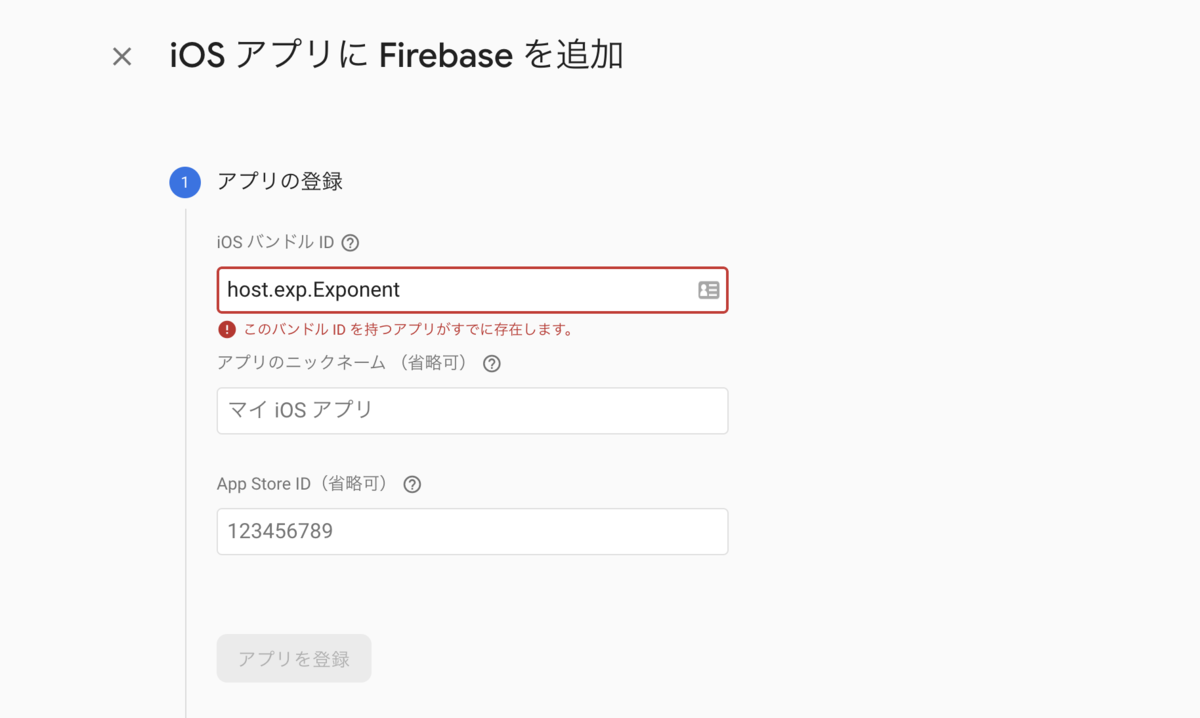
次にFirebaseのiOSアプリに iOS バンドル ID: host.exp.Exponentでプロジェクトを追加(host.exp.ExponentはExpo Goのバンドル IDです)
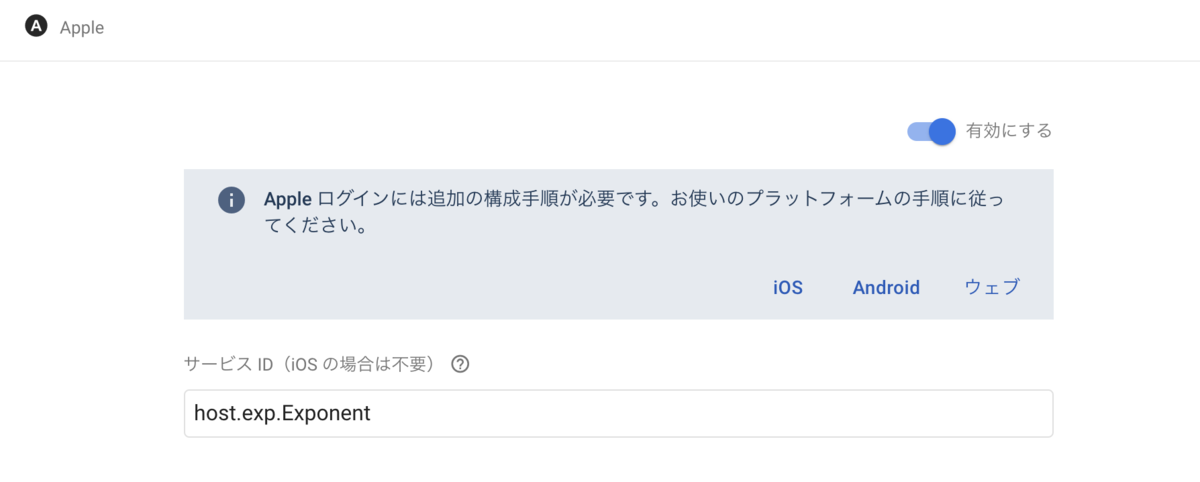
FirebaseのAuthenticationのAppleを有効に変更して、サービス IDに host.exp.Exponentを追加
これで設定周りは完了。次はログインボタンを実装 ログインボタンは、AppleAuthentication.AppleAuthenticationButtonとしてライブラリに実装されているので、そのまま使用
■ src/components/templates/Login/Page.tsx
import * as AppleAuthentication from 'expo-apple-authentication';

(省略)

    <AppleAuthentication.AppleAuthenticationButton
      buttonType={AppleAuthentication.AppleAuthenticationButtonType.SIGN_IN}
      buttonStyle={AppleAuthentication.AppleAuthenticationButtonStyle.BLACK}
      cornerRadius={5}
      style={styles.button}
      onPress={props.onAppleLogin}
    />
次にFirebaseのログイン部分をcustom hooksとして実装
■ src/hooks/useFirebaseAuth.tsx
import * as AppleAuthentication from 'expo-apple-authentication';
import { useRecoilValueLoadable, useSetRecoilState } from 'recoil';
import { useCallback, useEffect, useState } from 'react';
import { Alert } from 'react-native';
import firebase from 'lib/system/firebase';
import 'lib/firebase';
import AsyncStorage from '@react-native-async-storage/async-storage';
import { storageKey } from 'lib/storage';
import { existAuthUserID } from 'store/selectors';
import { authUserState } from 'store/atoms';
import Auth from 'lib/auth';

const auth = new Auth();

export type UseFirebaseAuth = ReturnType<typeof useFirebaseAuth>;

const nonceGen = (length: number) => {
  let result = '';
  let characters =
    'ABCDEFGHIJKLMNOPQRSTUVWXYZabcdefghijklmnopqrstuvwxyz0123456789';
  let charactersLength = characters.length;
  for (let i = 0; i < length; i++) {
    result += characters.charAt(Math.floor(Math.random() * charactersLength));
  }
  return result;
};

const useFirebaseAuth = () => {
  const authUserID = useRecoilValueLoadable(existAuthUserID);
  const setAuthUser = useSetRecoilState(authUserState);
  const [setup, setSetup] = useState(false);

  const setSession = useCallback(
    async (refresh = false) => {
      const idToken = await auth.setSession(refresh);

      if (idToken) {
        const authUID = await AsyncStorage.getItem(storageKey.AUTH_UID_KEY);
        setAuthUser({
          uid: authUID,
        });
      }

      return idToken;
    },
    [setAuthUser]
  );

  const firebaseLogin = useCallback(
    async (credential: firebase.auth.OAuthCredential) => {
      const data = await firebase
        .auth()
        .signInWithCredential(credential)
        .catch((error: any) => {
          console.log(error);
        });

      console.log(data);

      return await setSession(true);
    },
    [setSession]
  );

  const onAppleLogin = useCallback(async () => {
    const nonce = nonceGen(32);
    const digestedNonce = await Crypto.digestStringAsync(
      Crypto.CryptoDigestAlgorithm.SHA256,
      nonce
    );

    try {
      const result = await AppleAuthentication.signInAsync({
        requestedScopes: [
          AppleAuthentication.AppleAuthenticationScope.FULL_NAME,
          AppleAuthentication.AppleAuthenticationScope.EMAIL,
        ],
        nonce: digestedNonce,
      });
      const provider = new firebase.auth.OAuthProvider('apple.com');
      const credential = provider.credential({
        idToken: result.identityToken || '',
        rawNonce: nonce,
      });

      firebaseLogin(credential);
    } catch (e) {
      console.log('error:', e);
      Alert.alert('ログインに失敗しました');
    }
  }, [firebaseLogin]);

  const onLogout = useCallback(async () => {
    await auth.logout();
    setAuthUser({
      uid: null,
    });
  }, [setAuthUser]);

  useEffect(() => {
    if (authUserID.state === 'hasValue') {
      if (authUserID.contents) {
        setAuthUser({ uid: authUserID.contents });
      }
    }
  }, [authUserID, setAuthUser]);

  useEffect(() => {
    const unsubscribe = firebase.auth().onAuthStateChanged(() => {
      setSetup(true);
    });

    return () => unsubscribe();
  }, []);

  return {
    setup,
    onAppleLogin,
    onLogout,
  };
};

export default useFirebaseAuth;
これで実装完了で以下のように動作しました


ちなみに、シミュレータのiOS 14はSign In with Apple時にFaceIDか指紋必須になったので、テストする時はiOS13のシミュレータでやる必要があるので注意
AndroidでGoogleログインを実装
前にペペロミアで実装した時は、Expoクライアントではexpo-google-app-auth、スタンドアローンアプリでは、 expo-google-sign-inを使用していましたが、memoirでは現在推奨されているexpo-applicationで実装しました。
まず、FirebaseのGoogleログインを有効にする
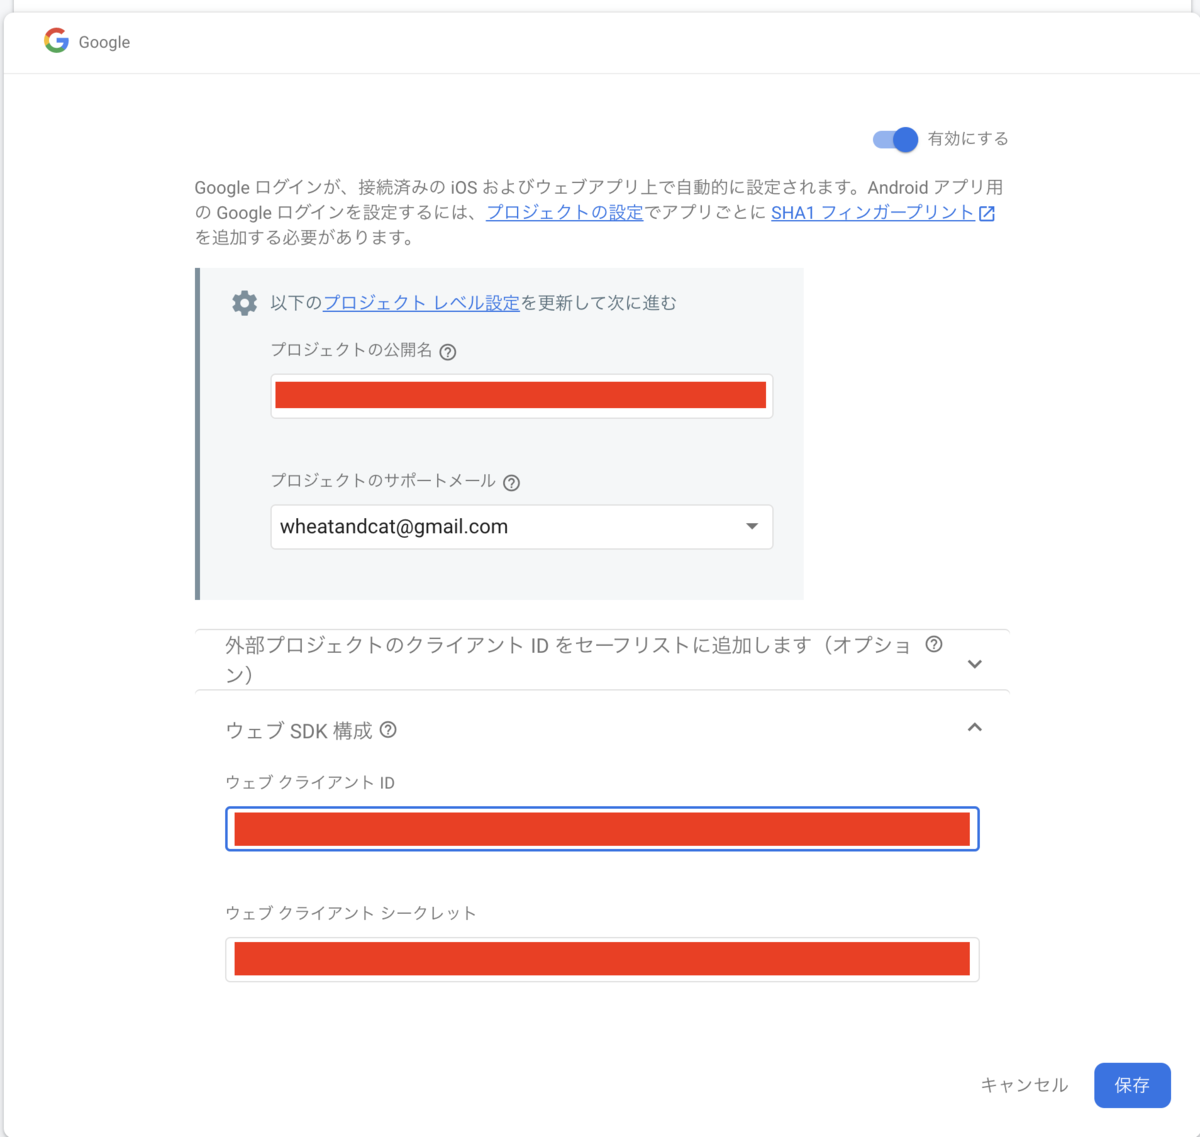
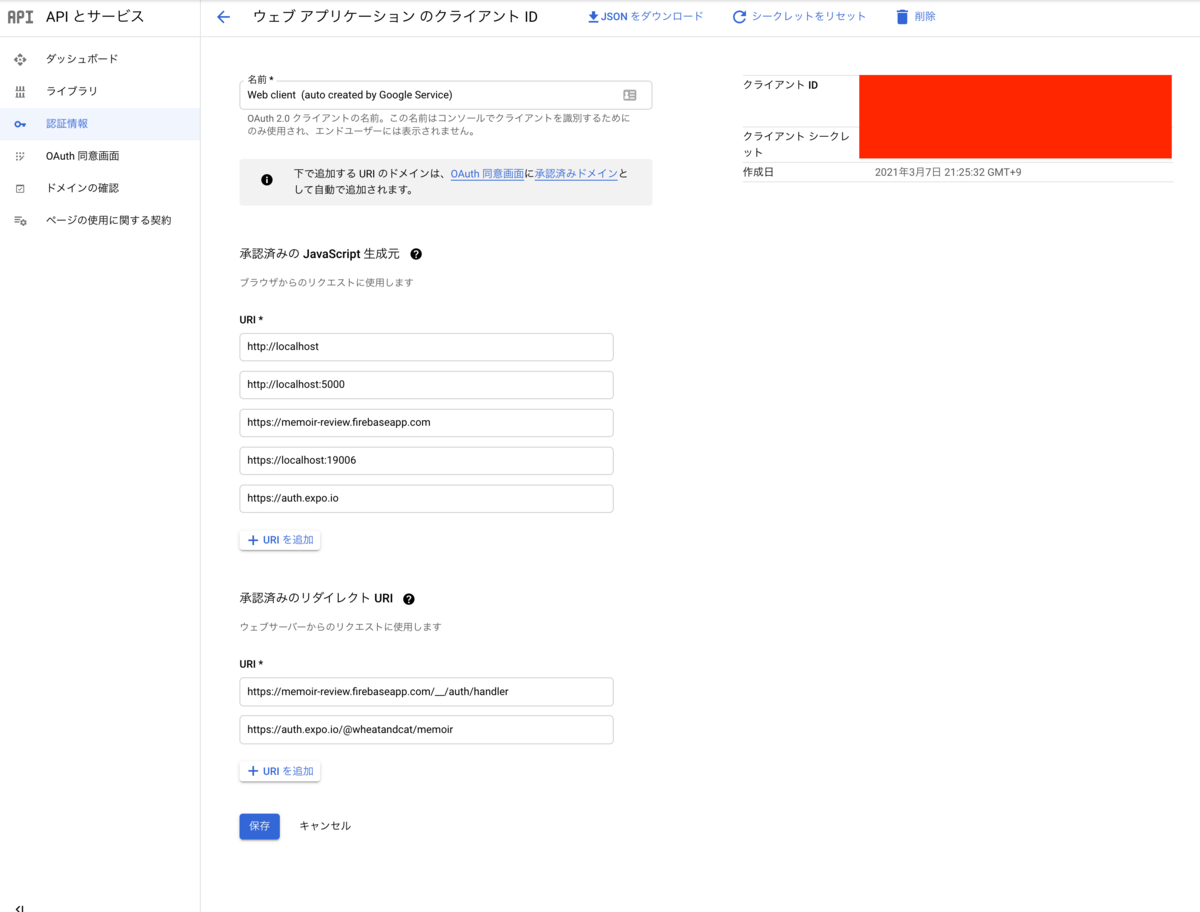
上記のウェブ クライアントIDの認証に設定を追加するので、 GCPの認証情報から上記のクライアントIDのものを探し編集して以下を設定
URI: https://auth.expo.io 承認済みのリダイレクト URI: https://auth.expo.io/@wheatandcat/memoir(自身のexpoのアプリのリンク)
上記のクライアントIDをアプリのconfigに設定
■.env
EXPO_GOOGLE_CLIENT_ID="***********"
これで準備は完了なのでソースコードの方を実装します。 まず、UIのログインボタンを部分を実装
■ src/components/templates/Login/Page.tsx
import View from 'components/atoms/View';
import Text from 'components/atoms/Text';
import Image from 'components/atoms/Image';

省略

<TouchableOpacity onPress={props.onGoogleLogin}>
    <View style={styles.googleButton}>
    <View>
        <Image
        source={require('../../../img/icon/icon_google.png')}
        width={25}
        height={25}
        />
    </View>
    <View px={2}>
        <Text fontFamily="NotoSansJP-Bold">Googleでログイン</Text>
    </View>
    </View>
</TouchableOpacity>
次にFirebaseのログイン部分をcustom hooksとして実装
■ src/hooks/useFirebaseAuth.tsx
import * as WebBrowser from 'expo-web-browser';
import * as Google from 'expo-auth-session/providers/google';
import { ResponseType } from 'expo-auth-session';
import * as Crypto from 'expo-crypto';
import { useRecoilValueLoadable, useSetRecoilState } from 'recoil';
import { useCallback, useEffect, useState } from 'react';
import { Alert } from 'react-native';
import firebase from 'lib/system/firebase';
import 'lib/firebase';
import AsyncStorage from '@react-native-async-storage/async-storage';
import { storageKey } from 'lib/storage';
import { existAuthUserID } from 'store/selectors';
import { authUserState } from 'store/atoms';
import Auth from 'lib/auth';

const auth = new Auth();

WebBrowser.maybeCompleteAuthSession();

export type UseFirebaseAuth = ReturnType<typeof useFirebaseAuth>;

const useFirebaseAuth = () => {
  const authUserID = useRecoilValueLoadable(existAuthUserID);
  const setAuthUser = useSetRecoilState(authUserState);
  const [setup, setSetup] = useState(false);

  const [request, response, promptAsync] = Google.useIdTokenAuthRequest({
    responseType: ResponseType.IdToken,
    expoClientId: process.env.EXPO_GOOGLE_CLIENT_ID,
  });

  const setSession = useCallback(
    async (refresh = false) => {
      const idToken = await auth.setSession(refresh);

      if (idToken) {
        const authUID = await AsyncStorage.getItem(storageKey.AUTH_UID_KEY);
        setAuthUser({
          uid: authUID,
        });
      }

      return idToken;
    },
    [setAuthUser]
  );

  const firebaseLogin = useCallback(
    async (credential: firebase.auth.OAuthCredential) => {
      const data = await firebase
        .auth()
        .signInWithCredential(credential)
        .catch((error: any) => {
          console.log(error);
        });

      console.log(data);

      return await setSession(true);
    },
    [setSession]
  );

  useEffect(() => {
    if (response?.type === 'success') {
      const { id_token } = response.params;
      const credential = firebase.auth.GoogleAuthProvider.credential(id_token);
      firebaseLogin(credential);
    } else if (response?.type === 'error') {
      console.log('error:', response);
      Alert.alert('ログインに失敗しました');
    }
  }, [response, firebaseLogin]);

  const onGoogleLogin = useCallback(() => {
    promptAsync();
  }, [promptAsync]);

  const onLogout = useCallback(async () => {
    await auth.logout();
    setAuthUser({
      uid: null,
    });
  }, [setAuthUser]);

  useEffect(() => {
    if (authUserID.state === 'hasValue') {
      if (authUserID.contents) {
        setAuthUser({ uid: authUserID.contents });
      }
    }
  }, [authUserID, setAuthUser]);

  useEffect(() => {
    const unsubscribe = firebase.auth().onAuthStateChanged(() => {
      setSetup(true);
    });

    return () => unsubscribe();
  }, []);

  return {
    setup,
    request,
    onGoogleLogin,
    onLogout,
  };
};

export default useFirebaseAuth;
これで実装完了で以下のように動作しました


ちなみに、RN debuggerを使用しているとGoogle.useIdTokenAuthRequestを使用時にクラッシュするという不具合があるので注意
