皆さん、こんにちは! デジスマチームの小島(@jiko_21)です。
このブログはデジスマチームブログリレーの1日目の記事です。
フロントエンド開発において、モーダル(ダイアログ)の実装は非常にポピュラーなタスクの1つです。しかし、近年のUIライブラリを見ていると、その「実装スタイル」が大きく様変わりしていることに気づかされます。
今回は、ダイアログの実装トレンドと、Radix UIなどのモダンなライブラリが裏側でどのように動いているのか、その「中身」について掘り下げてみたいと思います。
ダイアログ実装のトレンドの変化
2023年頃までの主流なスタイルでは、エンジニアが「今ダイアログが開いているかどうか」という状態を自ら管理するのが一般的でした。
従来のスタイル
よく見かけたのは、次のような useDisclosure などのフックを使う形です。
例えば、Chakra UI v2の<Modal />は、useDisclosureのフックから上記のisOpenやonOpen等が提供され、それをModalコンポーネントに渡したり、モーダルを開くためのボタン等に渡す、という仕様になっています。
// https://v2.chakra-ui.com/docs/components/modal の例より抜粋
function BasicUsage() {
  const { isOpen, onOpen, onClose } = useDisclosure()
  return (
    <>
      <Button onClick={onOpen}>Open Modal</Button>

      <Modal isOpen={isOpen} onClose={onClose}>
        <ModalOverlay />
        <ModalContent>
          <ModalHeader>Modal Title</ModalHeader>
          <ModalCloseButton />
          <ModalBody>
            <Lorem count={2} />
          </ModalBody>

          <ModalFooter>
            <Button colorScheme='blue' mr={3} onClick={onClose}>
              Close
            </Button>
            <Button variant='ghost'>Secondary Action</Button>
          </ModalFooter>
        </ModalContent>
      </Modal>
    </>
  )
}
この方式は挙動が直感的で分かりやすい反面、使う側が常に状態管理を意識し、複数のPropsを正しく指定しなければならないという手間がありました。
最新のスタイル
一方、最近の Chakra UI v3 や Radix UI(Headless UI)では、実装方法がガラリと変わっています。
最大の特徴は、「外部から開閉フラグを渡さない」という点です。 <Dialog.Root> という親コンポーネントの中に、トリガーとなる <Dialog.Trigger> を配置するだけで、状態管理がその内部に隠蔽されるようになりました。
// https://chakra-ui.com/docs/components/dialogより抜粋
import { Button, CloseButton, Dialog, Portal } from "@chakra-ui/react"


const Demo = () => {
  return (
    <Dialog.Root>
      <Dialog.Trigger asChild>
        <Button variant="outline" size="sm">
          Open Dialog
        </Button>
      </Dialog.Trigger>
      <Portal>
        <Dialog.Backdrop />
        <Dialog.Positioner>
          <Dialog.Content>
            <Dialog.Header>
              <Dialog.Title>Dialog Title</Dialog.Title>
            </Dialog.Header>
            <Dialog.Body>
              <p>
                Lorem ipsum dolor sit amet, consectetur adipiscing elit. Sed do
                eiusmod tempor incididunt ut labore et dolore magna aliqua.
              </p>
            </Dialog.Body>
            <Dialog.Footer>
              <Dialog.ActionTrigger asChild>
                <Button variant="outline">Cancel</Button>
              </Dialog.ActionTrigger>
              <Button>Save</Button>
            </Dialog.Footer>
            <Dialog.CloseTrigger asChild>
              <CloseButton size="sm" />
            </Dialog.CloseTrigger>
          </Dialog.Content>
        </Dialog.Positioner>
      </Portal>
    </Dialog.Root>
  )
}
利用者は「どのボタンがトリガーか」を指定するだけでよくなり、コードが非常に宣言的でスッキリしたものになります。
なぜ渡していないonClickが動くのか
ここで疑問が生じます。onClick もハンドラーも渡していないのに、なぜ <Dialog.Trigger> の中にあるボタンを押すだけでダイアログが開くのでしょうか。
それは、<Dialog.Trigger>によって子要素のボタンに対してハンドラーが付与されるためです。
今回はchakra-uiと同様のインタフェースを提供しているRadix UIのコードをもとに説明していきます。
まずは全体のデータの流れを整理してみましょう。
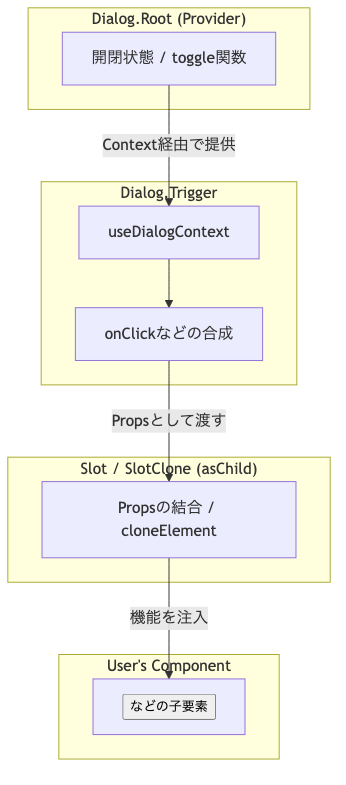
- Root側に開閉を管理する状態があり
- Triggerが開閉するための処理をcontextを受け取ったうえでonClickに割当
- Slotがその
onClickを子要素のボタンに受け渡す。
この流れを、Radix UIのコードで確認してみましょう。
Dialog.Triggerを読んでみる
// https://github.com/radix-ui/primitives/blob/main/packages/react/dialog/src/dialog.tsx#L98-L116 より抜粋
const DialogTrigger = React.forwardRef<DialogTriggerElement, DialogTriggerProps>(
  (props: ScopedProps<DialogTriggerProps>, forwardedRef) => {
    const { __scopeDialog, ...triggerProps } = props;
    const context = useDialogContext(TRIGGER_NAME, __scopeDialog);
    const composedTriggerRef = useComposedRefs(forwardedRef, context.triggerRef);
    return (
      <Primitive.button
        type="button"
        aria-haspopup="dialog"
        aria-expanded={context.open}
        aria-controls={context.contentId}
        data-state={getState(context.open)}
        {...triggerProps}
        ref={composedTriggerRef}
        onClick={composeEventHandlers(props.onClick, context.onOpenToggle)}
      />
    );
  },
);
Radix UIのTriggerは、useDialogContextというものを用いてダイアログ自体を操作する関数をcontextから取り出したうえでPrimitive.buttonというコンポーネントに渡しています。
では、Primitive.buttonを見てみましょう。
// https://github.com/radix-ui/primitives/blob/main/packages/react/primitive/src/primitive.tsx#L37-L53 より抜粋
const Primitive = NODES.reduce((primitive, node) => {
  const Slot = createSlot(`Primitive.${node}`);
  const Node = React.forwardRef((props: PrimitivePropsWithRef<typeof node>, forwardedRef: any) => {
    const { asChild, ...primitiveProps } = props;
    const Comp: any = asChild ? Slot : node;

    if (typeof window !== 'undefined') {
      (window as any)[Symbol.for('radix-ui')] = true;
    }

    return <Comp {...primitiveProps} ref={forwardedRef} />;
  });

  Node.displayName = `Primitive.${node}`;

  return { ...primitive, [node]: Node };
}, {} as Primitives);
Primitive.buttonという名のコンポーネント自体は明示的に実装されていませんが、NODESの配列内にbutton自体も含まれており、次のように読み替えることが可能です。
const Slot = createSlot(`Primitive.button`);

const Primitive.button = React.forwardRef((props: PrimitivePropsWithRef<typeof node>, forwardedRef: any) => {
  const { asChild, ...primitiveProps } = props;
  const Comp: any = asChild ? Slot : 'button';

  if (typeof window !== 'undefined') {
    (window as any)[Symbol.for('radix-ui')] = true;
  }

  return <Comp {...primitiveProps} ref={forwardedRef} />;
};
ここで、重要なポイントが2点ほどあります。
1点目はcreateSlotという謎の関数によりSlotという変数が生成されていることです。
2点目はそのSlotという変数を返すかどうかはasChildというフラグによって管理されていることです。
ここで鍵となるのが、Dialog.Trigger に渡している asChild フラグです。このフラグの有無によって、最終的にブラウザへ出力される DOM 要素の挙動が次のように切り替わります。
asChildなし(デフォルト): ライブラリ側が用意した<button>タグがそのままレンダリングされます。asChildあり: ライブラリ側のbuttonタグは消滅し、代わりにcreateSlotで生成されたSlotコンポーネントが実体となります。
今回の例だとasChildを指定しているため、createSlotを見ていく必要があります。
createSlotを見てみる
それでは、createSlotを見ていきましょう
// https://github.com/radix-ui/primitives/blob/main/packages/react/slot/src/slot.tsx#L43-L88より抜粋
/* @__NO_SIDE_EFFECTS__ */ export function createSlot(ownerName: string) {
  const SlotClone = createSlotClone(ownerName);
  const Slot = React.forwardRef<HTMLElement, SlotProps>((props, forwardedRef) => {
    let { children, ...slotProps } = props;
    if (isLazyComponent(children) && typeof use === 'function') {
      children = use(children._payload);
    }
    const childrenArray = React.Children.toArray(children);
    const slottable = childrenArray.find(isSlottable);

    if (slottable) {
      // the new element to render is the one passed as a child of `Slottable`
      const newElement = slottable.props.children;

      const newChildren = childrenArray.map((child) => {
        if (child === slottable) {
          // because the new element will be the one rendered, we are only interested
          // in grabbing its children (`newElement.props.children`)
          if (React.Children.count(newElement) > 1) return React.Children.only(null);
          return React.isValidElement(newElement)
            ? (newElement.props as { children: React.ReactNode }).children
            : null;
        } else {
          return child;
        }
      });

      return (
        <SlotClone {...slotProps} ref={forwardedRef}>
          {React.isValidElement(newElement)
            ? React.cloneElement(newElement, undefined, newChildren)
            : null}
        </SlotClone>
      );
    }

    return (
      <SlotClone {...slotProps} ref={forwardedRef}>
        {children}
      </SlotClone>
    );
  });

  Slot.displayName = `${ownerName}.Slot`;
  return Slot;
}
コードの半分ほどはlazy component向けのコードですが、SlotCloneというコンポーネントを生成したうえで子要素(children)を挟み込んでいます。このchildrenは先程のPrimitive.buttonのchildrenと同じもの、つまり<Dialog.Trigger />の子要素です。
ではSlotCloneはどのようなものでしょうか。
// https://github.com/radix-ui/primitives/blob/main/packages/react/slot/src/slot.tsx#L100-L122 より抜粋
/* @__NO_SIDE_EFFECTS__ */ function createSlotClone(ownerName: string) {
  const SlotClone = React.forwardRef<any, SlotCloneProps>((props, forwardedRef) => {
    let { children, ...slotProps } = props;
    if (isLazyComponent(children) && typeof use === 'function') {
      children = use(children._payload);
    }

    if (React.isValidElement(children)) {
      const childrenRef = getElementRef(children);
      const props = mergeProps(slotProps, children.props as AnyProps);
      // do not pass ref to React.Fragment for React 19 compatibility
      if (children.type !== React.Fragment) {
        props.ref = forwardedRef ? composeRefs(forwardedRef, childrenRef) : childrenRef;
      }
      return React.cloneElement(children, props);
    }

    return React.Children.count(children) > 1 ? React.Children.only(null) : null;
  });

  SlotClone.displayName = `${ownerName}.SlotClone`;
  return SlotClone;
}
特に重要なところは、React.isValidElementがtrue、つまり有効なReactElementの場合は、slotPropsとchildren.propsを結合したpropsをReact.cloneElementを用いて子要素に渡しているところです。
このReact.cloneElementはドキュメントにもあるように一般的には使うことを避けるべきapiではありますが、既存のComponentのpropsを書き換えることができます。
つまり、<Dialog.Trigger />の子要素だったボタンコンポーネントのpropsが上書きされます。
上書きの際に利用するpropsはslotのpropsを含むため、<Dialog.Trigger />側で提供しているonClickが渡されます。これにより、<Dialog.Trigger/>にラップするだけでボタンクリック時にダイアログの制御ができるようになるわけです。
最後に
ここ数年でダイアログ自体の実装パターンが変わりました。従来は、useDisclosureを用いて命令的に開発者が状態管理をしていましたが、RootやTriggerといったコンポーネントを利用することで宣言的に記述し、ライブラリ側が状態管理をするようになりました。
UIの利用側としては特に内部の実装を気にせずに使うことが多いかもしれないですが、複雑性と引き換えに汎用性が失われていないか、今一度考えるきっかけになれば、と思います。
We are Hiring!
エムスリーでは、フロントエンド・バックエンドに関わらず、新しい技術に興味のあるエンジニアを募集しています。新卒もお待ちしております!
