
自分が見たくなるように、ブログを書きたくなるように、モチベーションを高めるために、ブログをカスタマイズしています。記事にするほどでもないカスタマイズの小ネタを箇条書きしてあります。
- 表示のガタつきを防ぐため(overflow-yで)強制的に縦スクロールバーを表示した。
q-Az|スクロールバーの出現によるガタつきを防ぐCSS
CSS
html {
    overflow-y: scroll;
}
- リストの黒ポチのかわりにはてなのアイコンフォント(チェックマーク)を表示した。
サルワカ|コピペで使えるリストデザイン34選:CSSで箇条書きをおしゃれに
CSS
.entry-content ul {
    list-style-type: none;
}

.entry-content li:before {
    font-family: blogicon;
    content: "\f024\00a0";
    vertical-align: -1px;
}
- リストを折り返した時の1行目と2行目の頭文字を揃えた。
bl6.jp|li要素のテキストを折り返した時に頭文字の余白を揃えるやり方
CSS
.entry-content li {
    padding-left: 1.2em;
    text-indent: -1.2em;
}
- 「last-child」でカテゴリーや月別アーカイブの一番下のボーダーを消した。
Web(K)Campus|(K)last-child擬似クラスを使って、並ぶリストの最後の線を消す方法と使わない方法(CSS覚え書き)
- preタグ内でURLを自動リンクさせない。(<pre data-unlink=""> ~ </pre>)
あずまや|はてなブログでpreタグ内での自動リンクを回避する方法
くぜのメモ|URLを自動リンクさせずにテキストとして表示させる方法
- 日付の「-」(ハイフン)を「/」(スラッシュ)に変更した。
わたしと納豆ごはん|はてなブログで日付の表示形式を“年月日“などにするCSS
CSS
.hyphen {
    display: none;
}

.date-year:after,
.date-month:after {
    content: "/";
}
内部リンクの頭にはてなのアイコンフォント(Webフォント)を表示した。
おち研 技術部|コピペOK!外部リンクをCSSとアイコンフォントで目立たせる
NER|:before / :after の text-decoration を消す
CSS
.entry-content a[href^="https://simadzu.hatenablog.com/entry"]:before {
    font-family: blogicon;
    font-size: 16px;
    content: "\f024";
    display: inline-block;
    padding: 0 2px;
}
- jQueryのセレクタ指定で、idやclassの前にHTMLタグを指定しない(省略する)。
MILL KEY WEB|jQuery高速化!処理速度を10倍上げるテクニック20選
KAYAC engineers' blog|jQueryのCSSセレクタAPIを高速に扱う方法
- 画像の下にできるの謎の余白を消した。
WEBクリエイターの部屋|【css】画像(img)の下に余白(隙間)ができる問題を秒で解決する方法
- jQueryでの要素の存在確認の記述を変更した。
例:ページの中に「.page-entry」があれば個別記事ページとして判断する場合、「if($('.page-entry').length)」を「if($('.page-entry')[0])」にした。
きほんのき|[JS][jQuery] 要素の存在を確認する6通りのコードと実行速度
- Youtubeの埋め込み動画をレスポンシブ対応させた。
らいちのヒミツ基地|【css】YouTube動画をコンテナ幅いっぱいに表示させるaspect-ratio設定
HTML
<div class="video">
    <iframe src="動画のURL" frameborder="0"></iframe>
</div>
CSS
.video {
    width: 100%;
    aspect-ratio: 16 / 9;
}

.video iframe {
    width: 100% !important;
    height: 100% !important;
}
画像の一部を擬似要素タグと「content」を使って先読みするようにした。
Stack Overflow|Preloading CSS Images
CSS
body:before {
    position: absolute;
    z-index: -1;
    content: url(画像のURL) url(画像のURL);
}
- トップページの「こちらもおすすめ」の左右に「display:flex」で水平線を表示した。
参考になるブログ・Webサイト
簡潔に書きます。 タイトルを挟む1pxとかの横線を簡単に書くCSSを一生懸命考えてみたので忘備録。
 のんびりデザインしているような。
- aboutページのHTMLをHTML Minifierで圧縮した。
- 上に戻るボタンのマウスオーバー時にすぐ消えるツールチップを表示した。
Pa-Tuブログ|ツールチップをCSSで実装する
Qiita(@86_nagatomo)|とりあえずCSSだけで要素を〇〇秒後に表示したい
- なるべく蛍光ペンに近い(形の)マーカーでテキストを目立たせることにした。
Dr. Martin's Blog|CSSのみでリアルな蛍光マーカーを表現する
- 今さらながら画像の一部にwidthとheight属性を指定した。
(最新のブラウザはimg要素のwidthとheight属性の値をもとにアスペクト比を計算し、ページ読み込み中に画像のスペースをより正確に保持するようになったらしい)
Rriver|【2020年夏】imgタグにはwidthとheight属性を書くのがいいらしい
- タイトルロゴ
とカレンダー風の日付の背景をpng形式の画像で自作し、Base64でエンコード、CSSに背景画像として埋め込んだ。
ぼうびろく|text-indent:-9999px; の代わりになるもの
- ファーストビューで表示されるアイキャッチ画像に「loading="eager"」「fetchpriority="high"」を設定した(「decoding=”async”」は設定しない)。
Qiita(@nuko-suke)|PageSpeed Insightsで100点満点の爆速サイト🚀にした話
セカヤサブログ|【徹底解説】imgタグのdecoding属性は指定しなくてもいい
- アイキャッチ画像の下(「.hatenablog-entry(.entry-content)」直下のpタグ)だけにマージンを設定した。
自然体|親要素直下の最初のタグだけスタイルを設定する
CSS
.entry-content > *:first-child {
    margin-bottom: 30px;
}
- フォントにtext-shadowを設定(二度づけ)してキレイに見えるようにした。
jdash2000 site|Webフォントをキレイに見せるテクニックを2つ紹介(Chrome編)
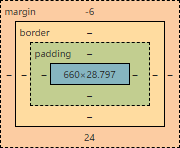
- ブログのフォントサイズを16px、行の高さを1.8、段落の余白を30pxにした。
(line-heightの上下の余白をネガティブマージンで打ち消した)
※ 16px - ( 16px × 1.8 ) / 2 = -6.4 → line-heightの上下の余白は6pxか7px
TAKLOG|line-heightのハーフ・レディングを打ち消す`calc((1em - 1lh) / 2)`をCSS変数に定義しておくとよい
CSS
.entry-content {
    font-size: 16px;
    line-height: 1.8;
}

.entry-content p {
    margin: -6px 0 24px;
}
上段落0px(line-height上余白6px+pタグの上余白-6px)
下段落30px(line-height下余白6px+pタグの下余白24px)
ブログカードをマウスでホバー(hover)したときに枠線で強調しているが、スマートフォンでは枠線を表示しない。
うぇぶの人|img要素(画像)の内側にborder(枠・罫線)をつける方法
Zenn(かがん)|【CSS】まだホバー時のスタイルを :hover だけで指定してるの?
Qiita(@kyntk)|メディアクエリの(hover: hover)は(hover)って省略できるらしい
- (グローバル)ヘッダの色を白から黒に、ヘッダの点滅しているグレーのスケルトンスクリーン(画像やテキストのプレースホルダー)を表示しない。
無駄と文化|はてなブログのグローバルヘッダーをダークテーマっぽくする【失敗】
CSS
/* ヘッダの色を白から黒に */
#globalheader {
    background: #fff;
    mix-blend-mode: difference;
}

/* ヘッダのスケルトンスクリーンを非表示 */
#globalheader-container:before,
#globalheader-container:after {
    content: none !important;
}
- 関連記事が1つしかないときは関連記事を表示しない。
note for coding|CSSで条件分岐。<li>が1つしかない<ul>にだけ適用する
CSS
.hatena-module-related-entries:has(li:only-child) {
    display: none;
}
