I created my own game using Python. This article documents everything from the preparation involved in game development to the implementation challenges I encountered, and the final game design.
- Introduction
- Game Overview
- Creating a Game with Python
- Conclusion
- References
Introduction
Wanting to Create Something
I wanted to try making something.
Recently, as a beginner, I've been gradually learning how to write code, so I immediately wanted to create something new.
When thinking about what to make with programming, games came to mind first. I'm not a huge gaming enthusiast, but games are familiar, easy to visualize, and seemed fun to create.
That's how I decided to make my own game.
Why I Chose Python
I chose Python for this game project because I found it to be a very accessible language.
Python has simple syntax and doesn't require cluttered code for a single implementation.
For example, comparing Java and Python, even when writing code for the same purpose of "displaying a game window," the amount of code required is completely different.
On the flip side, Python is relatively slow in processing and seems unpopular for game development. However, being able to write code easily is extremely important for beginners like me.
I also considered using a game engine like Unity, but since my goal this time was to create a game with my own hands, I ruled that out.
Python has a game development library called "pygame." I used this to create my game from scratch.
# Versions
Python 3.7.2
pygame 1.9.5
Note: This article was translated from my original post.
Game Overview
Here's the overview of the final game.
The game itself is distributed on itch.io.
Feel free to give it a try if you'd like:
The source code is available on GitHub.
To run the game from the source code, please refer to the following steps:
# Install pygame
pip install pygame

# Clone the source code
git clone https://github.com/bioerrorlog/CellForRest_Pygame.git

# Run the game
cd CellForRest_Pygame/game/
python CellForRest.py
I'll describe step by step what I made, how I made it, and where I got stuck throughout this article.
As a beginner who just started programming, I doubt my code represents the best approach. I was constantly struggling to find better ways while writing it.
That said, games don't get finished if you keep worrying. I hope you'll understand this as something a beginner wrote with the goal of at least making it work.
Now, let me reflect on the process one by one.
Creating a Game with Python
Learning Python/pygame Basics
Trying Out Tutorials
First, I started by researching the basics of game development with Python.
Even when I suddenly decided I wanted to make a game, I had no idea how to go about it. I didn't know anything fundamental about game creation, like how to display a window or how to implement a moving screen.
So first, I decided to acquire the minimum basics through tutorials available online. Since I prefer watching videos over reading text, I searched YouTube for "Python game dev" and followed what seemed to be the most popular tutorial by sentdex.
While it's in English, the source code and procedure were clear, making it a tutorial where you could follow the basics without understanding everything being said. Also, since online information is overwhelmingly in English, I think it was a good tutorial for getting used to English early on.
Through the tutorial, I learned basic game implementation methods like:
- Displaying game windows
- Displaying images
- Implementing game loops
- Flow from start screen to game/menu screens
- Implementing text/button displays
- Detecting mouse/keyboard events
For those starting from zero knowledge like me, I recommend casually going through any tutorial. It gives you courage and hope about creating your own game.
Helpful Game Development Resources
Next, I'll introduce resources that were helpful during development. I wish I'd known about these earlier as they would have made the process smoother.
This is a Japanese translation of the official pygame beginner guide. It introduces 13 principles beginners should know.
As I'll explain later, topics like processing speed were particularly important, so I recommend reviewing this early.
An article (in English) about design patterns for game programming. While the Japanese translation is published as a book, the English HTML version is available online.
The content felt advanced to me, so I didn't read it very thoroughly, but reading it during free time occasionally yielded important hints. It's also good practice for getting used to English.
Reddit is a famous overseas forum. The pygame board there has daily discussions among pygame users.
Of course, I would have preferred a Japanese pygame community, but I couldn't find an active one. Instead, I joined this subreddit and watched others creating games. I think it's good to find some kind of community to maintain motivation.
Looking back, these three were particularly helpful. That said, there's probably still plenty of useful information online, so take this as just a reference.
[Related Article] Implementing Boids Flocking Simulation with Godot Engine | Artificial Life
Thinking About Game Design
The Design Kept Changing
Once I understood game creation to some extent, next I thought about what kind of game to make.
However, the design I had in mind before starting changed almost completely. As I progressed with implementation, thinking "let's change the design after all" or "let's implement it differently," what I initially started making became something completely different.
Looking back now, I think trying to finalize the game design before starting was foolish. I lack programming experience and can't fully grasp what implementations will be difficult. Furthermore, since this was my first time creating a game, I couldn't visualize what kind of game I wanted without seeing something tangible.
So I decided to proceed with implementation casually, like starting to sketch freely. I'd start writing, change things without hesitation if I didn't like them, and bring it closer to the image in my head.
This is probably a free and fun way of creating that's only possible when individuals work on hobbies. Thanks to this, I was able to enjoy creating the game.
Final Game Design
Now, regarding the final form of the game, it turned out similar to Cookie Clicker.
Cookie Clicker, borrowing the explanation from Wikipedia:
Each time you click the cookie appearing on screen, you bake one cookie (you can increase cookies per click with items). Baked cookies can be spent on purchasing cookie production facilities, gradually allowing you to obtain massive amounts of cookies.
In other words, it's a simple game of just increasing cookies.
There's something like level-up addiction in how cookies increase exponentially as the game progresses, and I remember getting quite hooked myself.
What I ended up creating is a game where you move between three stages while increasing a value called "Leaf" instead of cookies (Fig. 1).

The Cell stage (Fig. 2), Tree stage (Fig. 3), and Cave stage (Fig. 4) each have different roles.
Let me briefly explain the game screens, starting with the Cell stage.

①: Stage transition buttons
→ Move to other stages
②: Leaf
→ Displays "Leaf" balance
③: Gate
→ Clicking generates "Cell"
→ Generating "Cell" consumes "Leaf"
④: Cell
→ Green things that wiggle around
→ After moving around for a while, they bud into "Bud"
→ They divide once before budding to produce more "Cells"
⑤: Bud
→ What "Cell" becomes
→ Can be harvested by clicking
→ "Leaf" is obtained when harvested
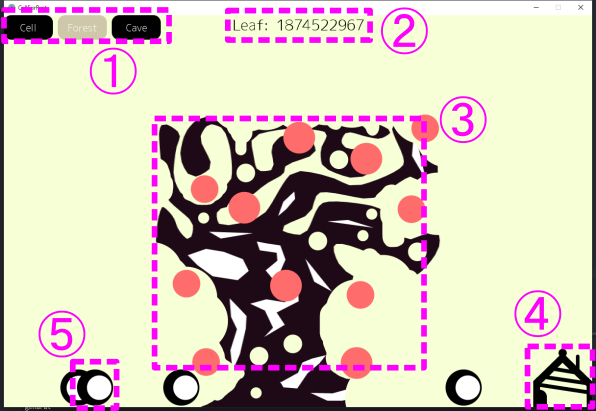
※For linguistic reasons, the stage transition button uses "Forest" instead of "Tree."
①: Stage transition buttons
→ Move to other stages
②: Leaf
→ Displays "Leaf" balance
③: Tree
→ Automatically adds "Leaf" according to level
→ Gets bigger according to level
→ Leveling up consumes "Leaf"
④: House
→ Clicking generates "Human"
→ Generating "Human" consumes "Leaf"
⑤: Human
→ Multiplies "Tree" effect according to number
→ Moves around on the ground
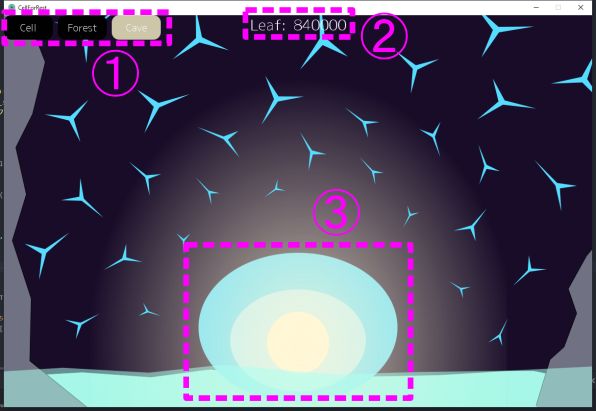
①: Stage transition buttons
→ Move to other stages
②: Leaf
→ Displays "Leaf" balance
③: BlueGem
→ Sways up and down
→ Multiplies "Leaf" acquisition amount in Cell stage according to level
→ Leveling up consumes "Leaf"
→ Blue things around it increase according to level
That's roughly what the finished game looks like.
Implementation
From here on, I'll note points of caution regarding the source code. I'll leave memos for my future self about the difficulties I faced.
※The source code is available on GitHub.
Overall Source Code Structure
First, let me summarize the overall structure of the source code (Fig. 5).

gameInit() method displays the start screen, and when the Start button is pressed on the start screen, the gameLoop() method begins. Inside the gameLoop() method, the game loop continues running, progressing the game.
Within the game loop, LayerManager class objects corresponding to each of the three stages are running. The LayerManager class generates, holds, and deletes character objects appearing in each stage.
Methods used throughout the game, like button() and textDisplay(), were declared outside classes so each class could use them.
That's roughly the overall picture. From here, I'll leave notes about parts that required attention.
Game Loop
The game loop is a mechanism for expressing games as animations rather than still images.
Game processing and drawing processing are executed within a single while loop, repeating continuously.
I implemented it as follows this time.
Below is just an excerpt of the gameLoop() method:
# Game loop: event.get() -> update() -> draw() -> display.update() -> clear()
# Close button: Quit game
# m button: Menu
# Left click: Inform each game layer via setMouseEventUp()
def gameLoop():
    global intro
    intro = False
    game_exit = False

    cellLayerManager = CellLayerManager()
    treeLayerManager = TreeLayerManager()
    caveLayerManager = CaveLayerManager()

    while not game_exit:
        for event in pygame.event.get():
            if event.type == pygame.QUIT:
                gameQuit()
            elif event.type == pygame.KEYDOWN:
                if event.key == pygame.K_m:
                    menu()
            elif event.type == pygame.MOUSEBUTTONUP and event.button == 1:
                # cellLayerManeger uses pygame.mouse.get_pressed()
                treeLayerManager.setMouseEventUp(True)
                caveLayerManager.setMouseEventUp(True)

        cellLayerManager.update()
        treeLayerManager.update()
        caveLayerManager.update()

        if cell_layer == True:
            cellLayerManager.draw()
        elif tree_layer == True:
            treeLayerManager.draw()
        elif cave_layer == True:
            caveLayerManager.draw()

        pygame.display.update()
        clock.tick(30)

        cellLayerManager.clear()
        treeLayerManager.clear()
        caveLayerManager.clear()
The flow is to generate one object of the LayerManager class corresponding to each stage, then enter the loop:
- Event acquisition:
pygame.event.get() - Update processing:
update() - Drawing processing:
draw() - Display update:
pygame.display.update() - Post-update processing:
clear()
I repeated this in a loop.
Event acquisition gets keyboard and mouse button events. This required some attention, which I'll discuss separately later.
I made update() a method that's always called once per loop, mainly handling numerical updates for each stage.
Meanwhile, draw() was made to execute only for the currently displayed stage among the three stages.
For display updates with pygame, you can specify fps with clock.tick().
fps stands for frames per second, indicating how many times per second the screen updates.
I set it to 30fps this time.
Even as the game progressed and processing objects increased, it rarely dropped below 30fps.
Conversely, setting this to 60fps or so would make performance degradation more noticeable when processing objects increase.
I also defined post-update processing clear() to use when initializing values after display updates.
So the three LayerManager classes always have these update(), draw(), and clear() methods, which are called in sequence per frame in the game loop.
That was the game loop I created this time.
Causes and Solutions for Click Events Not Being Detected
During development, I encountered a situation where mouse clicks weren't being detected. Even though I wrote code to detect left clicks, it only recognized about half of them. Let me note the cause and solution.
First, there are two methods for detecting mouse and keyboard input.
The Pygame Guide for Beginners states:
The first method is to directly check the input device state. This can be achieved by calling functions like pygame.mouse.get_pos() or pygame.key.get_pressed(). This will tell you the input device state at the moment you call the function.
Using methods like pygame.mouse.get_pressed() continues detecting while clicking, so there are no missed detections.
However, one click results in multiple detections, which isn't convenient in some cases.
For example, when performing level-up processing with a button press, you might intend to level up once but end up leveling up multiple times (to the maximum).
When you want one click detection per click, you need to implement using the second method.
The second method is to use SDL's event queue. This queue becomes a list of events—when an event is detected, it's added to the list. And these events are removed from the list when retrieved.
This method uses pygame.event.get().
What you must be careful about when using this is that "events are retrieved and removed from the list" each time you call pygame.event.get().
In other words, if you write pygame.event.get() in multiple places and call pygame.event.get() multiple times within one game loop, missed detections will occur.
So this time, I called pygame.event.get() once in the game loop and passed the result to each LayerManager:
def gameLoop():
・
・omitted
・
    while not game_exit:
        for event in pygame.event.get():
            if event.type == pygame.MOUSEBUTTONUP and event.button == 1:
                # cellLayerManeger uses pygame.mouse.get_pressed()
                treeLayerManager.setMouseEventUp(True)
                caveLayerManager.setMouseEventUp(True)
By using for event in pygame.event.get():, you can retrieve and verify each mouse click and keyboard button press state one by one.
In this case, event.type == pygame.MOUSEBUTTONUP detects that a mouse button was released, and event.button == 1 recognizes it as a left click.
Passing True to the setMouseEventUp() method created in each LayerManager is quite inelegant, but it works, so it's acceptable.
You can write keyboard press and close button processing in similar ways. Please refer to the source code and pygame documentation for details.
Loading Image Files
Loading image files also required some attention.
Initially, I was simply loading images like this:
img = pygame.image.load('img.png')
However, this isn't a very good approach.
Because it doesn't use convert().
The Pygame Guide for Beginners also states:
When I first read the explanation of surface.convert(), I didn't think it was worth worrying about. "I only use png, so everything I handle should be in the same format, so I don't need convert()"—but this turned out to be very wrong.
I was in exactly the same situation.
According to the pygame documentation, the convert() function:
When no arguments are specified, the Surface will have the same pixel format as the display Surface. This method always results in the most optimized format for image drawing in the display environment being used. Before performing image drawing processing, it's good to change the pixel format to an optimal state with the Surface.convert() command.
I don't fully understand it, but apparently changing the "pixel format" to match the display speeds up image drawing processing.
To apply convert(), load images like this:
img = pygame.image.load('img.png').convert()
Just add .convert() at the end.
By the way, when you need to preserve transparency for png images, use .convert_alpha().
In my case, since I was also displaying the background with png images, applying this convert()/convert_alpha() dramatically improved image drawing performance.
In terms of fps, there was roughly a 3x or greater difference.
It's important not to forget convert() when loading images.
Character Drawing and Rendering
Let me also write a bit about character drawing and rendering processing.
First, I used two drawing tools:
Inkscape
Free vector graphics tool.
Rather than freehand drawing with paint tools, combining shapes, lines, and curves in Inkscape better concealed my lack of artistic talent, so I mainly used this.
FireAlpaca
Free paint tool.
While I rarely drew characters themselves with this, I occasionally used it because applying layer effects was very easy.
Basically, I'd draw characters in Inkscape and apply effects in FireAlpaca.
"Applying effects" sounds fancy, but it's just about slightly changing the overall color tone of images.
Since I wanted characters to brighten slightly on mouse hover, I prepared color-variant images for each character (Fig. 6).

The rendering process to swap displayed images on mouse hover was implemented in the draw() method of character classes like Cell and Tree as follows:
def draw(self):
    mouse = pygame.mouse.get_pos()
    if self.x+self.width > mouse[0] > self.x and self.y+self.height > mouse[1] > self.y:
        game_display.blit(self.act_img, (self.x, self.y))
    else:
        game_display.blit(self.inact_img, (self.x, self.y))
Getting the mouse position with mouse = pygame.mouse.get_pos(), if the X coordinate mouse[0] and Y coordinate mouse[1] fall within the image position, display the mouse hover image act_img with blit(), otherwise display the original image inact_img.
This character class's draw() method is called by the LayerManager class's draw() method, which in turn is called by the game loop, resulting in characters being rendered on screen.
Reflections
The purpose of this project was to try making something. So the finished product has many points for reflection.
First, I barely did any game balance adjustment. Because my goal was just to create something, I didn't assume anyone would actually play it. So I spent almost no time on game balance adjustment, which is the heart of a game.
Additionally, this game has no save function. This is fatal for this type of idle game. Implementing a save function with pygame seemed a bit tricky, so I gave up. If I feel motivated, it might be interesting to try tackling it.
Looking back at the code, reflection points emerge each time, but first off, cramming the source code into a single file wasn't good. Because the game creation tutorial I referenced wasn't object-oriented, it ended up half-baked. Making dependencies between classes thinner and separating them into files would be more readable and reusable.
Also, I didn't use class inheritance this time. Despite having similar classes, none of them have parent classes, so common elements couldn't be extracted, making the code harder to read.
Next time I make something, I want to improve these things.
Conclusion
This time, I created my own game with Python.
Rather than programming practice, this was the first thing I made by thinking for myself. Thanks to that, I had various interesting experiences.
Come to think of it, it took quite a long time.
Morning coding sessions while drinking coffee were a small pleasure.
This article ended up quite long.
There are many other things I want to do.
Let me put a period on this game here and move on to the next thing.
[Related Articles]
References
- YouTube
- 初心者のための pygame ガイド
- A Newbie Guide to pygame — pygame v2.6.0 documentation
- Table of Contents · Game Programming Patterns
- https://www.reddit.com/r/pygame/
- クッキークリッカー - Wikipedia
- event - Pygameドキュメント 日本語訳
- surface - Pygameドキュメント 日本語訳
- Inkscape - Draw Freely. | Inkscape
- FireAlpaca [ファイアアルパカ]|フリーペイントツール
