前々回 と 前回 は、QEMU で Arm の組み込み Linux(Buildroot+BusyBox)を動かしました。
今回は、Buildroot の別のオプションで Linux を構築します。
それでは、やっていきます。
はじめに
「QEMUを動かす」の記事一覧です。良かったら参考にしてください。
・第2回:STM32(ARM Cortex-M)をQEMUで動かす(ソースコード確認編)
・第3回:STM32(ARM Cortex-M)をQEMUで動かす(スタートアップルーチン編)
・第4回:STM32(ARM Cortex-M)をQEMUで動かす(リンカスクリプト編)
・第5回:STM32(ARM Cortex-M)のELFファイルの内容を確認する
・第6回:STM32(ARM Cortex-M)のELFファイル⇔バイナリの変換を行う
・第7回:STM32(ARM Cortex-M)のバイナリから構築したELFファイルをQEMUで動かす
・第8回:QEMUのビルドに必要なxpm(xPack Project Manager)について学ぶ
・第9回:QEMUをソースからビルドして動かす
・第10回:QEMUのソースコードを変更してSTM32の動作を変える
・第11回:QEMUに似たRenodeというOSSの組込みデバイスエミュレータを試す
・第12回:QEMUに似たRenodeでSTM32をGDBを使ってデバッグする
・第13回:QEMUに似たRenodeでSTM32をバイナリファイルで動かす
・第14回:QEMUに似たRenodeをソースからビルドする
・第15回:QEMUに似たRenodeでVSCodeを使ってデバッグする
・第16回:QEMUに似たRenodeでVSCodeを使ってRenode自体をデバッグする
・第17回:QEMUで組み込みLinux(Buildroot+BusyBox)をやってみる
・第18回:QEMUで組み込みLinux(Buildroot+BusyBox)をやってみる、の補足
・第19回:QEMUで組み込みLinux(Buildroot+BusyBox)にU-Bootを追加する ← 今回
Buildroot の Documentation です。
https://buildroot.org/downloads/manual/manual.html
それでは、やっていきます。
Buildrootのmenuconfigでu-bootを追加する
Buildroot の Documentation の Part1 の Chapter 4. Buildroot quick start を見ます。
U-BootのBoard defconfigに何も指定しない場合
とりあえず、実行してみます。
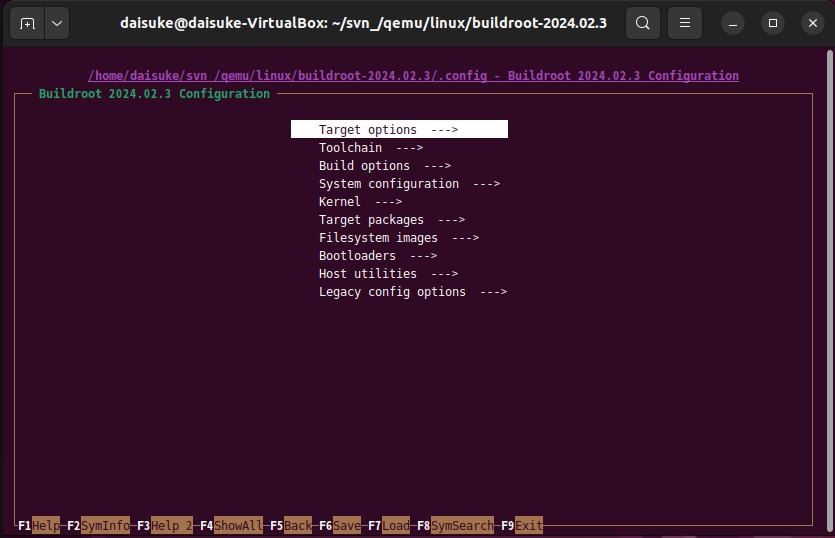
$ make menuconfig
カーネルのコンフィグレーションと同じようなメニューが起動しました。

他にも別のインタフェースがあるようなので試します。
$ make nconfig
見た目が違うだけで、内容は同じようです。
他にも、xconfig、gconfig がありましたが、起動しようとするとエラーになりました。
慣れている menuconfig を使います。
まずは、U-Boot を有効にしてみます。
Bootloaders → U-Boot にチェックを入れます(Enterキー)。
すると、U-Boot の細かい設定が表示されます。今は、デフォルトのままとします。
exit すると、コンフィグレーションが保存されます。
トップディレクトリの .config が更新されました。.config.old と比較すると、U-Boot の項目が not set だったのが、=y に代わり、U-Boot に関する項目が追加されました。
とりあえず、そのまま make します。
$ make
boot/uboot/uboot.mk:521: *** No board defconfig name specified, check your BR2_TARGET_UBOOT_BOARD_DEFCONFIG setting.  中止.
make: *** [Makefile:82: _all] エラー 2
U-BootのBoard defconfigにqemu_armを指定した場合
少し調べてみると、menuconfig のときに、Board defconfig に、何らかの defconfig を指定する必要があるようです。
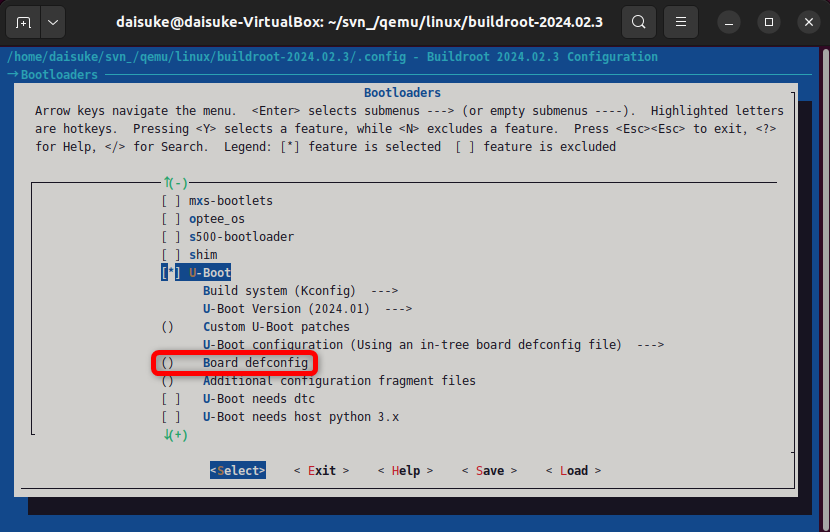
HELP を見ると、xxx_defconfig という名前のようです。
$ find . -name 'qemu_arm*'
./configs/qemu_arm_vexpress_tz_defconfig
./configs/qemu_arm_ebbr_defconfig
./configs/qemu_arm_vexpress_defconfig
./configs/qemu_arm_versatile_defconfig
./output/build/host-qemu-8.1.1/roms/u-boot/configs/qemu_arm_defconfig
./output/build/host-qemu-8.1.1/roms/u-boot/configs/qemu_arm64_defconfig
下から2番目の qemu_arm_defconfig が良さそうです。しかし、これは、ビルド後にできたディレクトリですね。まぁ、やってみます。
qemu_arm_defconfig の qemu_arm だけを指定します。
$ make
In file included from tools/imagetool.h:24,
                 from tools/aisimage.c:7:
include/image.h:1397:12: fatal error: openssl/evp.h: そのようなファイルやディレクトリはありません
 1397 | #  include <openssl/evp.h>
      |            ^~~~~~~~~~~~~~~
compilation terminated.
make[3]: *** [scripts/Makefile.host:112: tools/aisimage.o] エラー 1
make[3]: *** 未完了のジョブを待っています....
make[2]: *** [Makefile:1858: tools] エラー 2
make[1]: *** [package/pkg-generic.mk:283: /home/daisuke/svn_/qemu/linux/buildroot-2024.02.3/output/build/uboot-2024.01/.stamp_built] エラー 2
make: *** [Makefile:82: _all] エラー 2
エラーが出ました。Web で対処方法を調べます。
$ sudo apt install libssl-dev
先に進んで、ビルドが完了しました。
$ ll -h output/images/
合計 14M
drwxr-xr-x 2 daisuke daisuke 4.0K  6月 23 18:40 ./
drwxrwxr-x 6 daisuke daisuke 4.0K  6月 18 23:15 ../
-rw-r--r-- 1 daisuke daisuke  64M  6月 23 18:40 rootfs.ext2
-rwxr-xr-x 1 daisuke daisuke  814  6月 23 18:40 start-qemu.sh*
-rw-r--r-- 1 daisuke daisuke 863K  6月 23 18:40 u-boot.bin
-rwxr-xr-x 1 daisuke daisuke  14K  6月 18 23:15 vexpress-v2p-ca9.dtb*
-rw-r--r-- 1 daisuke daisuke 5.1M  6月 18 23:15 zImage
output/images に、u-boot.bin が増えました。
start-qemu.sh を見ると、内容に変化がありませんでした。
まずは、カーネルを指定して、カーネルから起動してみます(U-Boot は使われないと思う)。
起動してみて、前回と、起動ログを比較してみます。
起動して、起動ログを見てみましたが、やはり、起動ログに大きな変化はありませんでした。
参考にしているサイトです。
start-qemu.sh の内容を以下のように変更します。
起動が U-Boot から開始するように、-kernel に、u-boot.bin を指定します(あとで、-bios に u-boot.bin を指定するのも試す)。
起動してみましたが、いつものように、u-boot の起動ログが出てほしいのですが、全く出ません(笑)。
$ file output/images/u-boot.bin
output/images/u-boot.bin: COM executable for DOS
ARM じゃない。。ちゃんと、環境変数を設定しないといけないってことですね。make clean しないとですね。
$ make clean
$ make ARCH=arm CROSS_COMPILE=arm-linux-gnueabi- > 20240623
-make-uboot2.log 2>&1
make clean は、.config 以外は、全部ビルドし直しですね、1時間コースです。
ビルドしてる間に、ログを見てると、主要な内容には、「>>> 」が付いてますね。ログをファイルに保存しておき、この文字列で検索すると、何をビルドしてるのかが、よく分かります。
その後、ビルドが完了して、早速起動してみましたが、状況は変わらず、U-Boot のログは全く出ません。
U-BootのBoard defconfigにvexpress_ca9x4を指定した場合
うまくいかないようなので、参考サイトに従って、vexpress_ca9x4 を指定するように変更します。
一応、defconfig を探しておきます。
$ find ../../../ -name '*vexpress_ca9*'
../../../output/build/uboot-2024.01/configs/vexpress_ca9x4_defconfig
../../../output/build/uboot-2024.01/include/configs/vexpress_ca9x4.h
U-Boot 用の vexpress 用のコンフィグファイルがありました。
こちらを指定してやり直します。
$ make menuconfig
U-Boot だけ再ビルドする方法がありました。ターゲットに、uboot-menuconfig を指定すればいいようです。
$ make ARCH=arm CROSS_COMPILE=arm-linux-gnueabi- V=1 uboot-menuconfig > 20240625-make-uboot.log 2>&1
ログを見ると、U-Boot だけがビルドされています(ルートファイルシステムは毎回固め直されているようです)。
起動してみたところ、変化がありません。U-Boot のディレクトリ(output/build/uboot-2024.01)の .config が更新されてないような気がします。
distcleanで最初からやり直す
仕方ないので、最初からやり直します。
$ make distclean
$ make menuconfig # U-Boot と express_ca9x4 を指定します
$ make ARCH=arm CROSS_COMPILE=arm-linux-gnueabi- V=1 > 20240625-make.log 2>&1
また、1時間かかってビルドが完了しました。
まずは、普通にカーネルから起動します。
output/images/start-qemu.sh
問題なく起動しました。
start-qemu.sh を書き換えます。
#exec qemu-system-arm -M vexpress-a9 -smp 1 -m 256 -kernel zImage -dtb vexpress-v2p-ca9.dtb -drive file=rootfs.ext2,if=sd,format=raw -append "console=ttyAMA0,115200 rootwait root=/dev/mmcblk0"  -net nic,model=lan9118 -net user  ${EXTRA_ARGS} "$@"
exec qemu-system-arm -M vexpress-a9 -smp 1 -m 256 -kernel ../build/uboot-2024.01/u-boot -drive file=rootfs.ext2,if=sd,format=raw -net nic,model=lan9118 -net user  ${EXTRA_ARGS} "$@"
では、U-Boot を起動します。
VNC server running on 127.0.0.1:5900

U-Boot 2024.01 (Jun 25 2024 - 23:42:33 +0900)

DRAM:  256 MiB
WARNING: Caches not enabled
Core:  18 devices, 10 uclasses, devicetree: embed
Flash: 128 MiB
MMC:   mmci@5000: 0
Loading Environment from Flash... *** Warning - bad CRC, using default environment

In:    serial
Out:   serial
Err:   serial
Net:   eth0: ethernet@3,02000000
Hit any key to stop autoboot:  0
MMC Device 1 not found
no mmc device at slot 1
switch to partitions #0, OK
mmc0 is current device
** No partition table - mmc 0 **
Couldn't find partition mmc 0:1
smc911x: detected LAN9118 controller
smc911x: phy initialized
smc911x: MAC 52:54:00:12:34:56
BOOTP broadcast 1
DHCP client bound to address 10.0.2.15 (3 ms)
*** Warning: no boot file name; using '0A00020F.img'
Using ethernet@3,02000000 device
TFTP from server 10.0.2.2; our IP address is 10.0.2.15
Filename '0A00020F.img'.
Load address: 0x60100000
Loading: *
TFTP error: 'Access violation' (2)
Not retrying...
smc911x: MAC 52:54:00:12:34:56
missing environment variable: pxefile_addr_r
smc911x: detected LAN9118 controller
smc911x: phy initialized
smc911x: MAC 52:54:00:12:34:56
BOOTP broadcast 1
DHCP client bound to address 10.0.2.15 (0 ms)
Using ethernet@3,02000000 device
TFTP from server 10.0.2.2; our IP address is 10.0.2.15
Filename 'boot.scr.uimg'.
Load address: 0x60100000
Loading: *
TFTP error: 'Access violation' (2)
Not retrying...
smc911x: MAC 52:54:00:12:34:56
smc911x: detected LAN9118 controller
smc911x: phy initialized
smc911x: MAC 52:54:00:12:34:56
BOOTP broadcast 1
DHCP client bound to address 10.0.2.15 (1 ms)
Using ethernet@3,02000000 device
TFTP from server 10.0.2.2; our IP address is 10.0.2.15
Filename 'boot.scr.uimg'.
Load address: 0x60100000
Loading: *
TFTP error: 'Access violation' (2)
Not retrying...
smc911x: MAC 52:54:00:12:34:56
cp - memory copy

Usage:
cp [.b, .w, .l, .q] source target count
Wrong Image Format for bootm command
ERROR: can't get kernel image!
=>
やっと、U-Boot が起動しました。
start-qemu.shをもう少し変えてみる
output/images/u-boot.bin は使わず、output/build/uboot-2024.01/u-boot を使いました。
何通りか試してみます。まずは、-kernel に output/images/u-boot.bin を指定します。
#exec qemu-system-arm -M vexpress-a9 -smp 1 -m 256 -kernel zImage -dtb vexpress-v2p-ca9.dtb -drive file=rootfs.ext2,if=sd,format=raw -append "console=ttyAMA0,115200 rootwait root=/dev/mmcblk0"  -net nic,model=lan9118 -net user  ${EXTRA_ARGS} "$@"
#exec qemu-system-arm -M vexpress-a9 -smp 1 -m 256 -kernel ../build/uboot-2024.01/u-boot -drive file=rootfs.ext2,if=sd,format=raw -net nic,model=lan9118 -net user  ${EXTRA_ARGS} "$@"
exec qemu-system-arm -M vexpress-a9 -smp 1 -m 256 -kernel u-boot.bin -drive file=rootfs.ext2,if=sd,format=raw -net nic,model=lan9118 -net user  ${EXTRA_ARGS} "$@"
U-Boot の起動ログは出ませんでした。
次は、-kernel の代わりに、-bios を指定してみます。先に、output/images/u-boot.bin を指定します。
#exec qemu-system-arm -M vexpress-a9 -smp 1 -m 256 -kernel zImage -dtb vexpress-v2p-ca9.dtb -drive file=rootfs.ext2,if=sd,format=raw -append "console=ttyAMA0,115200 rootwait root=/dev/mmcblk0"  -net nic,model=lan9118 -net user  ${EXTRA_ARGS} "$@"
#exec qemu-system-arm -M vexpress-a9 -smp 1 -m 256 -kernel ../build/uboot-2024.01/u-boot -drive file=rootfs.ext2,if=sd,format=raw -net nic,model=lan9118 -net user  ${EXTRA_ARGS} "$@"
#exec qemu-system-arm -M vexpress-a9 -smp 1 -m 256 -kernel u-boot.bin -drive file=rootfs.ext2,if=sd,format=raw -net nic,model=lan9118 -net user  ${EXTRA_ARGS} "$@"
exec qemu-system-arm -M vexpress-a9 -smp 1 -m 256 -bios ../build/uboot-2024.01/u-boot -drive file=rootfs.ext2,if=sd,format=raw -net nic,model=lan9118 -net user  ${EXTRA_ARGS} "$@"
こちらも、U-Boot の起動ログは出ませんでした。
最後に、-bios に output/images/u-boot.bin を指定してみます。
#exec qemu-system-arm -M vexpress-a9 -smp 1 -m 256 -kernel zImage -dtb vexpress-v2p-ca9.dtb -drive file=rootfs.ext2,if=sd,format=raw -append "console=ttyAMA0,115200 rootwait root=/dev/mmcblk0"  -net nic,model=lan9118 -net user  ${EXTRA_ARGS} "$@"
#exec qemu-system-arm -M vexpress-a9 -smp 1 -m 256 -kernel ../build/uboot-2024.01/u-boot -drive file=rootfs.ext2,if=sd,format=raw -net nic,model=lan9118 -net user  ${EXTRA_ARGS} "$@"
#exec qemu-system-arm -M vexpress-a9 -smp 1 -m 256 -kernel u-boot.bin -drive file=rootfs.ext2,if=sd,format=raw -net nic,model=lan9118 -net user  ${EXTRA_ARGS} "$@"
#exec qemu-system-arm -M vexpress-a9 -smp 1 -m 256 -bios ../build/uboot-2024.01/u-boot -drive file=rootfs.ext2,if=sd,format=raw -net nic,model=lan9118 -net user  ${EXTRA_ARGS} "$@"
exec qemu-system-arm -M vexpress-a9 -smp 1 -m 256 -bios u-boot.bin -drive file=rootfs.ext2,if=sd,format=raw -net nic,model=lan9118 -net user  ${EXTRA_ARGS} "$@"
これも、U-Boot の起動ログは出ませんでした。
output/images に出力される u-boot.bin は何のためにあるのか分かりませんでした。。。
おわりに
今回は、U-Boot を追加して、U-Boot が起動するところまで確認できました。
次回は、U-Boot の設定を行い、U-Boot からカーネルを起動するところまでやりたいと思います。
最後になりましたが、エンジニアグループのランキングに参加中です。
気楽にポチッとよろしくお願いいたします🙇
今回は以上です!
最後までお読みいただき、ありがとうございました。
